Classic Experience of Modern Themes for Model-Driven Apps
- Ania

- Nov 15, 2024
- 8 min read
Intro
A few weeks ago, I shared my initial experiences and impressions of the new Power Platform Settings App on LinkedIn. The app was introduced to replace the classic settings experience for model-driven apps.
One major disappointment for me was the complete removal of the Themes feature.
In the classic settings, Themes allowed admins to customise the colours within model-driven apps by simply adding HEX colour codes, as demonstrated below.
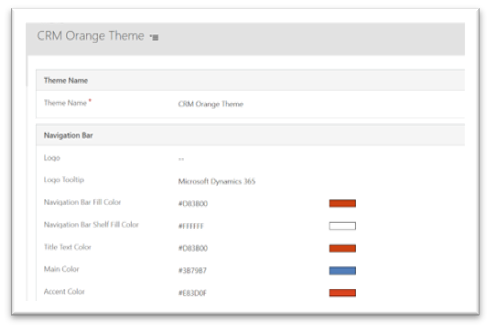
The removal wasn’t entirely surprising, given that modern themes now require setting up an XML web resource. However, I was hoping that an alternative feature would be introduced within the app itself - but unfortunately, that isn’t the case (or at least for now!).
Changing themes for environment model-driven apps is typically a one-off task - once it’s set up, it remains in place. Despite this, I felt a bit sentimental about the feature, so I decided to try re-creating it.
I'll admit, the final solution turned out to be a bit more complex than I initially intended…
However, I had lots of fun while doing it and I had to stretch my technical skills more than usual.
Along the way, I also learnt new things – including something I was not sure about, i.e. how deploying environment variables in managed solutions behaves in managed environments – I am happy to share my findings below!
So if you want to experiment with a few colour configurations for your model-driven apps and quickly demo them to your customer, you might find this solution useful.
Even if you don’t need the entire solution, I hope you can still find value in learning how to create XML web resources (a possibility I hadn’t realised before starting this project) or using Power Automate for calling flows using HTTPS and environment variables.
Custom Table
I began my solution by creating a custom table “Environment Theme” with the fields shown below – all of which are text fields.
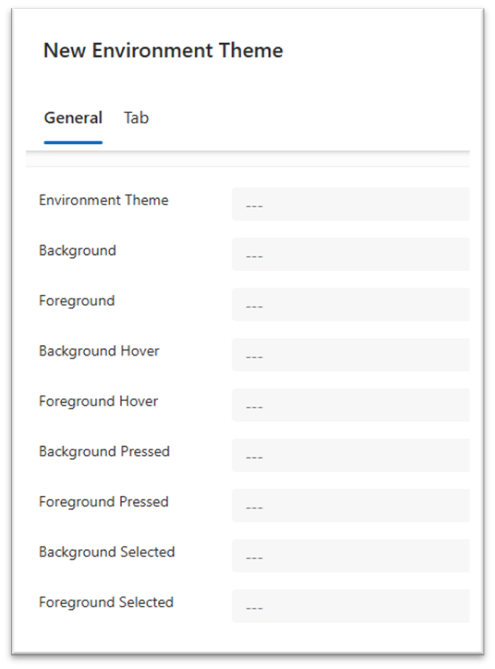
For the colour fields, I limited the character count to six, as HEX codes are always six digits, regardless of the colour.
In the classic experience, there’s a small rectangle that previews the colour, but unfortunately, I didn’t have a chance to build that feature here.
At some point, I would like to replace the form with a custom page, where I could definitely include a colour preview and even a colour picker to make finding HEX code providing a more seamless and user-friendly experience.
Power Automate Flow
The next step was setting up the Flow, which will be triggered via an HTTP request. This will be initiated by a custom button on the Environment Theme form, allowing me to execute JavaScript to kick off the Flow (more details on this below).

In case you haven’t worked with HTTP requests before, the HTTP POST URL is automatically generated once the flow is saved.
While this part is fairly straightforward, it becomes a bit more complex when deploying to another solution (more on that below!)
Additionally, when calling this request, I needed to pass the Environment Theme record GUID, so I included the following JSON for that purpose.
Next, I listed the Environment Theme records using the below filter which utilises the recordId parameter from my HTTP trigger:

ppc_environmentthemeid eq 'recordId' I also needed to "Initialize Environment Theme XML Content" variable.

The next step was to create the content of my XML web resource. Since I used the “List Rows” action, adding the “Set Variable” action automatically wrapped it in an “Apply to each” loop as shown below.

Here, I've built the XML content by reading the colour values directly from the "List Environment Themes rows" step.
Now it’s time to retrieve the web resources and locate the XML file. This web resource is already included in the solution I'm sharing, and it serves as a reference in the environment settings to override the themes.

name eq 'ppc_enviromentcolours'
In the next step, I updated the Content field of the web resource. I used the base64() expression to convert the Environment Theme XML Content variable into a format compatible with the XML file.

base64(variables('Environment Theme XML Content'))
The final step was to send the HTTP response.

After experimenting with different variations, I ended up with the JSON schema below. However, my JS is only interested in the status code, so probably that could be stripped down.
Also, make sure to always provided detailed name for your Flows, I named my:
Environment Theme | HTTP | Save and Publish ThemeEnvironment Variable
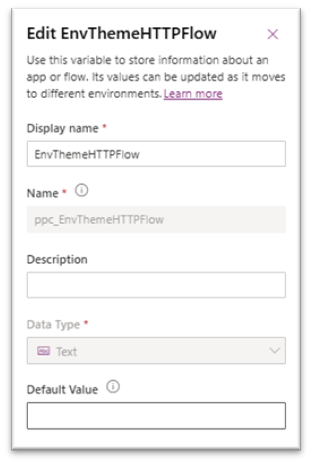
Subsequently, I created an Environment Variable “EnvThemeHTTPFlow” with data type as text. This variable stores the HTTP POST URL from my Flow.
I did it this way as this value is being changed when deployed to another environment. (Section Deployment of this blog outlines the process for handling this change).
Web Resources
Within my solution, I added three web resources: a JavaScript file, an XML file, and an SVG icon.
Java Script
The JavaScript file (PublishCustomisations) is triggered by the Publish Theme button on the Environment Theme record. Initially, it retrieves the Environment Variable value containing the URL for my HTTP request Flow, then calls the Flow using the retrieved URL. The Flow processes the record’s values, converting them into an XML file as outlined above.
After this, the Publish All function is initiated. I tried several methods to force a browser refresh to reload with the updated theme, but none of the solutions I found worked effectively, so I eventually left this out. While it’s not the smoothest experience, a professional coder advised me that an automatic refresh may not even be possible in this context...😢
Here’s the JS code, including my attempts at the refresh:
Please bear in mind that I'm not a professional coder, so if you are and if my code isn’t flawless or if some parts seem a bit rough around the edges, go easy on me! 😊 I ran into a few initial challenges, like handling HTTP request timeouts and ensuring that the Publish All action doesn’t trigger until the Flow has finished running. After some trial and error, I finally got it to a stable, functional point. I also attempted to add logic for troubleshooting, though there might still be a few gaps here and there…
XML file
XML web resource “ppc_enviromentcolours” is the file that contains the colours configurations for the modern-theme. More information can be found here: https://learn.microsoft.com/en-us/power-apps/maker/model-driven-apps/modern-theme-overrides
SVG file
The “Colorwheel” SVG file contains an image used as an icon for the Environment Them table.
Settings
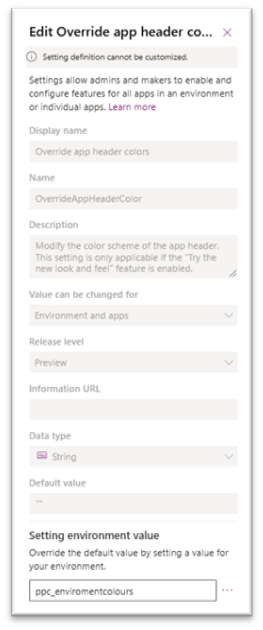
For the XML file content to be applied, it needs to be referenced in “Override app header colors“ setting. I set ppc_environmentcolours as the "Setting environment value," as shown below.
If you're creating a similar solution from scratch, keep in mind that the XML file name must match the name in the setting as well as the value specified in the Power Automate Flow.
Apps and Site Map
After setting up my table and automation, I added the Environment Theme table to the navigation within the Power Platform Environment Settings app.
In the classic experience, themes are accessed under “Customization”, so I placed them in the same location and I added a custom icon for consistency.

Environment Theme Command Bar
The last piece of the puzzle was to glue all of the above together by adding a custom button to the command bar on the Environment Themes main form.
I used the out of the box up arrow as an icon and I also passed PrimaryControl as Parameter 1. This setup allows the button to trigger the entire theme update process smoothly.

Final result
The final result is a fully integrated Environment Theme solution within the Power Platform Settings app. This setup allows for easy theme customization through a straightforward interface and automation that processes, converts, and applies the theme colours as an XML file.
With the custom button on the command bar, admin can now publish and apply new theme settings in a few clicks, making it easier to demo or implement different colour configurations efficiently.

Deployment
When deploying a solution with an environment variable, you're prompted to assign a value to it. However, this step is optional - you can skip it and leave the value blank to configure it later if needed.
If you're deploying my solution, you should also skip assigning a value at this step, as the value won’t be available until the solution import is complete. Once imported, you’ll be reminded to configure the environment variable with a warning message when you open the Power Apps Studio, like the one shown here.

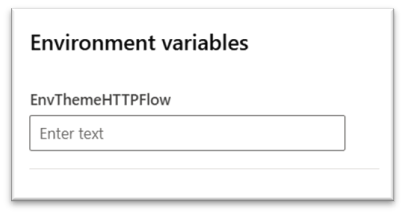
Once the solution is deployed, click on the “1 environment variable” link as shown above. This will allow you to update the EnvThemeHTTPFlow variable by adding the HTTP POST URL generated from the Flow in your environment.
When testing the deployments of my solution, I also tested a deployment of a managed solution to a managed environment.

Since I don’t have extensive experience with managed environments, I was pleasantly surprised to see that you still receive a prompt to update the environment variable! So, if you weren’t aware, you can indeed update an environment variable within a managed solution in a managed environment - and this won’t create an unmanaged layer.

Publishing Themes
Now it’s playtime! Head over to Power Platform Environment Settings, open Environment Themes, and either create a new record or edit an existing one.

Once ready, click Publish Theme. You’ll see the Processing Updates progress indicator appear, signalling that the initial updates are in progress, including the Flow execution.

Next, when the Publish All action is underway, you should see the status Publishing Theme displayed, indicating that the theme is being applied across the environment.

If any errors occur, the JavaScript should display an appropriate error message.
As noted earlier, the cache refresh doesn’t work automatically through my code. To view the updated theme, press Ctrl + F5 to refresh the page manually. This will ensure the new theme settings are applied and visible.
Solution
Complete managed and unmanaged solutions can be found here: https://github.com/aniablack/Modern-Themes-in-Model-Driven-Apps
Final Notes
A few key things to keep in mind when using or building this solution from scratch:
Global theme changes: Updating the modern themes will affect the colour scheme of all model-driven apps within that environment, so be mindful when making adjustments.
Accessibility and contrast: When testing different background and foreground colours, ensure that your colour choices are accessible with appropriate contrast. The below mix of pink and white is an example of a poor contrast and may be difficult to read. Personally, I use the “Inspect” option from Chrome to check the contrast ratio. If the contrast is insufficient, Chrome will provide a warning, as shown below.

Impact of "Publish All": The JavaScript includes a “Publish All” action, which will publish all pending changes in the environment. If other developers are working in the same environment, their work will also be published, so use this feature cautiously to avoid unintentional changes.
Security considerations: This solution does not include security configurations and is intended solely for environment admins. Be mindful of access and permissions if considering wider use.
Button colours (hover, pressed, selected): I haven’t observed any effect from setting hover, pressed, or selected colors—they may not be functional, or I may have missed something in the setup. Feel free to test further if you’re interested in exploring this aspect.
Have fun experimenting with the solution, and I’d love to hear your feedback!


Comments